Windows XP’s Files and Settings Transfer wizard is incompatible with Windows 7, but your Windows 7 installation disc provides an easy way to make the move.
 |
| Windows XP |
The best way to move to Windows 7 is always a clean install, as it ensures everything is precisely how Microsoft designed it to be from the start.
However, that can be a real pain if you already have an XP PC set up to your liking. Thankfully, Windows 7 provides an easy way to move your files and settings to the new operating system.
If you don't have a lot of files to transfer, and you don't need to transfer anything as complex as application settings or user accounts to your new PC, it can be just a simple to plug in a flash memory drive and manually copy across the files you need.
You run the risk of missing files if your data is poorly organised, but being selective about what you keep is a great way of making a fresh start on a pristine new computer.
 |
| Start easy transfer |
Step 01 — Start easy transfer
The file transfer process we describe here can be used whether you’re moving from a PC running Windows XP to a new Windows 7 machine or installing Windows 7 on the same PC. In XP, insert your Windows 7 disc. Close the installation window if it opens. Open Windows Explorer by right-clicking the Start menu and clicking My Computer, then right-click on the DVD drive icon and select Explore. Browse to the Support folder, then open the Migwiz folder. You’ll find a file called MIGSETUP or MIGSETUP.EXE: double-click it to run Windows 7’s Easy Transfer Wizard in XP. The Welcome screen explains all the merits of Windows Easy Transfer; feel free to read it, then click Nex
 |
| Choose your storage location |
Step 02 — Choose your storage location
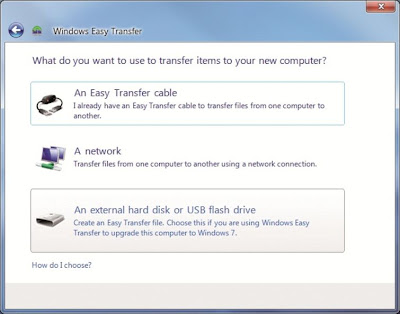
You’ll need some form of external storage to house your files during the transfer. If you only plan to copy a small quantity of data, you may be able to fit it onto a CD, a DVD or a USB flash drive, but it’s more likely you’ve built up a large quantity of files over the years. The best option is a second hard disk, either inside your PC or an external drive connected via USB or FireWire. If your PC is on a network, you can use another computer or a network attached storage (NAS) device to store your data temporarily. Choose the method most appropriate to you from the choices given. The next screen asks if this is your old computer; it can tell it’s running in XP, so it doesn’t give you the option of selecting this as your new computer – that comes later, once you’re in Windows 7
 |
| Choose files or settings |
Step 03 — Choose files or settings
You’ll have to wait briefly while the wizard scans your system to see what files and settings can be transferred – results will be presented in a ticklist. It divides the files into those kept by the main user (“asus” in our example) and Shared items, but if you want to see more details, click Customize. This will bring up a list of all the types of files it’s currently set to back up, including Desktop items, Favorites and Program settings.
If you don’t want a particular element to make the move to your new system, just deselect it. If you need finer control, clicking the Advanced button at the bottom will take you to a full file tree, so you can specify files and folders to keep.
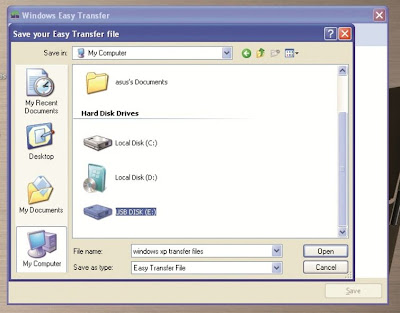
SAVE YOUR VITAL DATA Having chosen the files to keep, click through and you’ll be asked if you want to protect your backup with a password. Unless there are sensitive files, you can skip to the next step. You’ll be asked to name your set of files; choose something you’ll recognise easily later, such as “Windows XP transfer files” and browse to where you’ll save your data, as discussed in step 2. In our case, it’s a USB stick
 |
| Save your vital data |
Step 04 — Save your vital data
Having chosen the files to keep, click through and you’ll be asked if you want to protect your backup with a password. Unless there are sensitive files, you can skip to the next step. You’ll be asked to name your set of files; choose something you’ll recognise easily later, such as “Windows XP transfer files” and browse to where you’ll save your data, as discussed in step 2. In our case, it’s a USB stick
 |
| Finish with XP |
Step 05 — Finish with XP
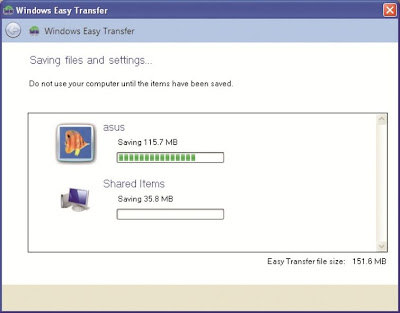
Once you’ve named the file and chosen the location, you can start the transfer. A window shows a progress indicator for each element. If you have a lot of data, now’s the time to make a cup of tea. When the process is complete, you’re told if any files didn’t back up properly; if you need them, copy them manually onto a USB drive or other storage device so that you can transfer them yourself.
You’ve now completed the steps to get your data from your old PC to your shiny new Windows 7 system
 |
| Continue in Windows 7 |
Step 06 — Continue in Windows 7
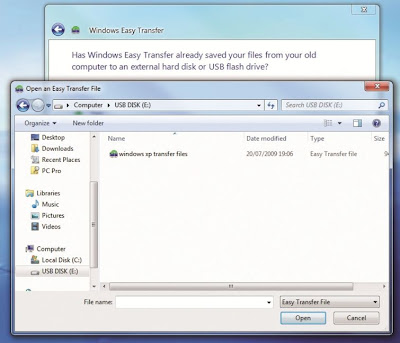
In Windows 7, click the Start orb and go to All Programs | Accessories | System Tools. Click on Windows Easy Transfer to begin the second stage. Click through the Welcome window and you’ll be asked what method you’ll be using. Select the storage you used earlier, and when asked whether this is your new or old PC click New to tell the wizard you already have your files backed up
 |
| Select your files |
Step 07 — Select your files
In Windows 7, click the Start orb and go to All Programs | Accessories | System Tools. Click on Windows Easy Transfer to begin the second stage. Click through the Welcome window and you’ll be asked what method you’ll be using. Select the storage you used earlier, and when asked whether this is your new or old PC click New to tell the wizard you already have your files backed up
 |
| Restore your data |
Step 08 — Restore your data
Windows 7 scans your backup and shows a window as in step 3. Choose what to restore, or leave everything selected. If necessary, click Advanced to select all sorts of fancy tasks, such as transferring a whole user account from the old system or mapping an entire drive from XP.
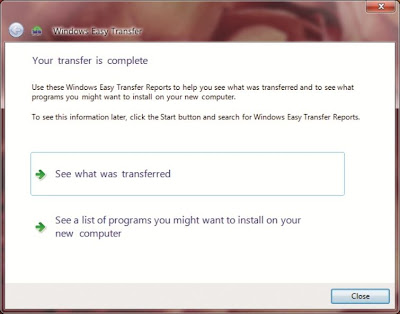
Click the Transfer button to begin the final stage. At the end, you’ll see exactly what was transferred; the wizard will also present a list of the software it detected on your old system, with links to product websites and information on Windows 7 compatibility, so you can start reinstalling
Enjoy!!


Conversion Conversion Emoticon Emoticon