
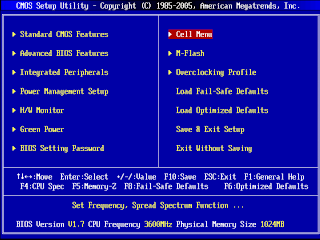
Step 01 — AMD BIOS: main menu
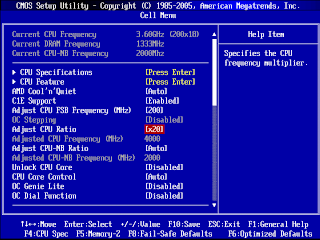
Step 02 — AMD Bios: CPU settings

Step 03 — AMD BIOS: multiplier options

Step 04 — AMD BIOS: new CPU frequency
Step 05 — AMD BIOS: base clock

Step 06 — AMD BIOS: north bridge multiplier


This is the main BIOS menu for an MSI Socket AM3 motherboard. On a board like this, you can access the settings used for overclocking by selecting “Cell Menu” and pressing Return. On other manufacturers’ boards, the option may have a different name, such as “CPU Settings”, “Frequency Control”, “Ai Tweaker” or “MB Intelligent Tweaker”.
Step 02 — AMD Bios: CPU settings

Here we see the various CPU settings, with a summary at the top showing the currently applied settings – a base clock of 200MHz and a multiplier of 18, giving a CPU frequency of 3.6GHz. The multiplier is referred to here as the “Ratio”, and by default it’s set to “Auto”, which will select the fastest multiplier permitted by the CPU.
Step 03 — AMD BIOS: multiplier options

Select the “Auto” setting (by moving down to it and pressing Return) and you’ll see plenty of options. In this example we’re changing the multiplier to 20, for an effective speed of 4GHz. With an unlocked chip you can take this number as high as you like: this board supports speeds in excess of 5GHz, though it’s very unlikely any CPU will run stably at these speeds. If your CPU isn’t unlocked, its multiplier won’t go above its stock setting: you can specify a higher setting in the BIOS, but this will have no effect.
Step 04 — AMD BIOS: new CPU frequency

We’ve selected our chosen multiplier and pressed Return. Now we’re returned to the CPU settings page. The figure below the cursor shows that the new CPU frequency will be. The numbers at the top of the page haven’t changed: the new settings are only applied when we save our changes and exit the BIOS. If you want to try out your new settings, you can do this now (the key commands are shown at the bottom of the screen). If you make a mistake, simply quit the BIOS without saving your changes and they’ll be discarded.
Step 05 — AMD BIOS: base clock

If your CPU is locked, you can raise the base clock instead of the multiplier. On this board the base clock is referred to as the FSB (front side bus). We’ve returned to the regular multiplier setting of 18, but raised the base clock by 20MHz – a 10% increase. This gives us an effective CPU speed of 3,960MHz, but it also raises the NB (north bridge) frequency by 10%. The north bridge – more properly called HyperTransport on AMD boards – is what connects the CPU to high-speed components such as the memory and graphics card. It’s only designed to run a 2.0GHz, so overclocking it in this way could cause problems.
Step 06 — AMD BIOS: north bridge multiplier

We can compensate for this by reducing the north bridge multiplier. Ordinarily this bus runs at 10x the speed of the base clock, but we can change that multiplier in the same way we changed the CPU multiplier. By turning it down to 9x we can get very close to its intended 2GHz speed while keeping our CPU frequency at close to 4GHz. Having done this, we can exit the BIOS and try out our new settings.
This is dummy text. It is not meant to be read. Accordingly, it is difficult to figure out when to end it. But then, this is dummy text. It is not meant to be read. Period.
Conversion Conversion Emoticon Emoticon