
Step 01 — Intel BIOS: main menu

Step 02 — Intel BIOS: CPU settings

Step 03 — Intel BIOS: advanced frequency settings
Step 04 — Intel BIOS: adjusting multipliers
Step 05 — Intel BIOS: adjusting the base clock


This is the main BIOS screen for a Gigabyte Sandy Bridge motherboard. On a board like this, you can access the settings used for overclocking by selecting “MB Intelligent Tweaker” and pressing Return. On other manufacturers’ boards, the option may have a different name, such as “CPU Settings”, “Frequency Control”, “Ai Tweaker” or, as above, “Cell Menu”.
Step 02 — Intel BIOS: CPU settings

The settings we want to change are the frequency settings: if your motherboard doesn’t show these directly within the CPU menu, they may be within a submenu, as here. On this page you can also see some of the current CPU settings, including a base clock of 100MHz (actually very slightly below, but this isn’t important).
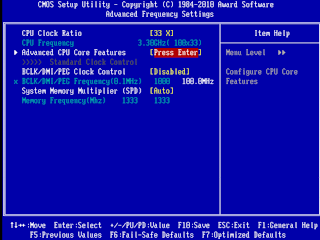
Step 03 — Intel BIOS: advanced frequency settings

In the Advanced Frequency Settings page, you can see that the CPU’s stock speed is set with a multiplier of 33 on a base clock of 100MHz, giving an effective frequency of 3.3GHz. On Intel processors with Turbo Boost you may have to go into CPU Core settings to find the multiplier settings; on older chips, you may be able to change the multiplier directly.
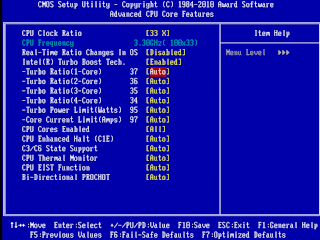
Step 04 — Intel BIOS: adjusting multipliers

Our sample CPU uses Turbo Boost. It therefore applies different multipliers depending on how many cores are in use. Here we can pick maximum multipliers to use when 1, 2, 3 and 4 cores are in use. We can also set power limits, which will govern how hard these cores can work before the CPU automatically cuts its own speed to keep power consumption and heat down.
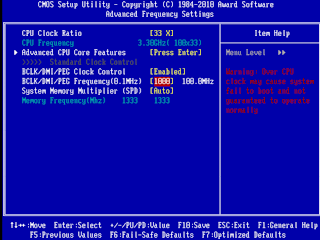
Step 05 — Intel BIOS: adjusting the base clock

If you want to adjust the base clock instead of the multiplier, that can be done from the main Frequency Settings page. This board lets you adjust the base clock (BCLK for short) in intervals of 0.1MHz, for fine tuning. It’s not recommended to tinker with this on a Sandy Bridge board though, as it affects not only the CPU but many other components that are unlikely to work properly if overclocked.
Once you’re happy with your change, you can exit the BIOS and save your settings to try them out. The key commands are shown at the bottom of the screen.
This is dummy text. It is not meant to be read. Accordingly, it is difficult to figure out when to end it. But then, this is dummy text. It is not meant to be read. Period.
Conversion Conversion Emoticon Emoticon